How to saddle stitch a durable leather wallet
34 min read Step-by-step guide to saddle stitch a long-lasting leather wallet using proper tools, thread sizes, and techniques for clean, durable seams and professional results. (0 Reviews)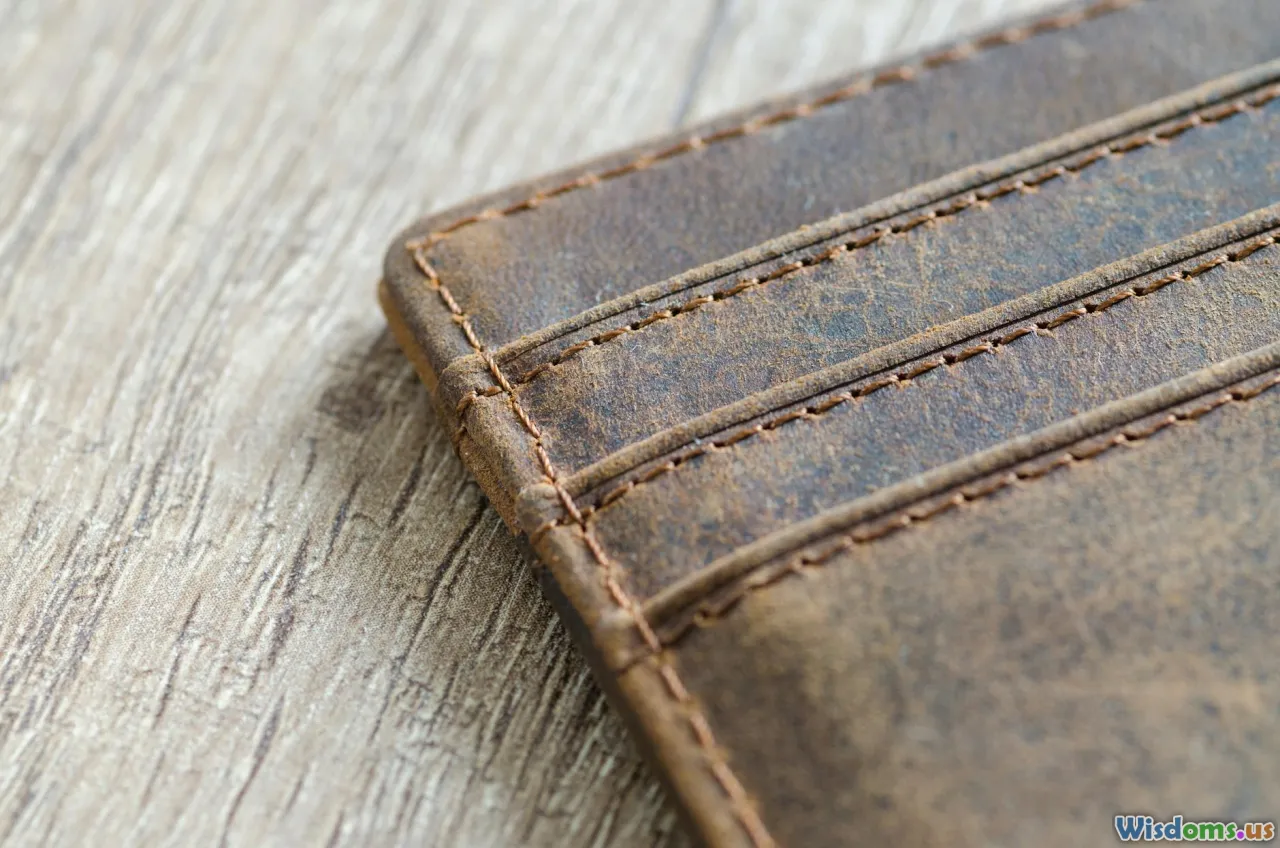
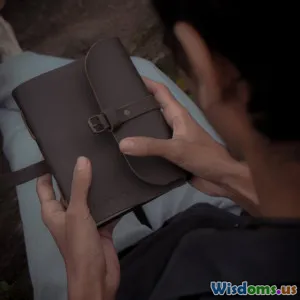
A good leather wallet is more than a place to keep cards; it is something you handle dozens of times a day. The difference between a wallet that lasts a decade and one that unravels after a season often comes down to the stitch. Saddle stitching, done by hand with two needles, creates a seam that is strong, repairable, and handsome. If you want a durable wallet that you can be proud to carry and that ages with you, mastering this stitch is worth your time.
Why saddle stitching matters for a wallet

A wallet is a stress test in your pocket. Its seams are flexed, humidified, dried, and abraded thousands of times. Machine lockstitching, the most common commercial method, relies on a looped top and bottom thread that interlocks in the middle of the leather. When one part breaks, the seam can unzip. Saddle stitching uses two needles and a single line of thread, passing through every hole from opposite sides. If one side is cut, the other side still holds, and the friction in each hole keeps the line intact.
Where wallets fail first:
- Mouths of card slots and cash pockets, which get stretched every time you slide items in or out
- Corners and ends of stitch lines, where tension concentrates
- Folds, where leather compresses and expands with body heat and moisture
Saddle stitching distributes load through each hole and gives you precise control over tension. You also choose hole spacing, thread type, and edge distance, all of which affect durability. The stitch becomes part of the design rather than a production shortcut.
Tools and materials that make durable stitches
Good tools help you keep holes consistent and tension even. You do not need everything, but a few items make the process smoother and the result stronger.
Core tools and materials:
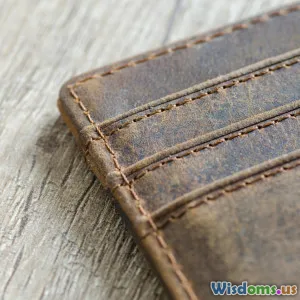
- Pricking irons or stitching chisels: 3.0 mm to 4.0 mm spacing for wallets is common. A 3.38 mm French-style iron delivers a fine, slanted stitch suitable for slim wallets.
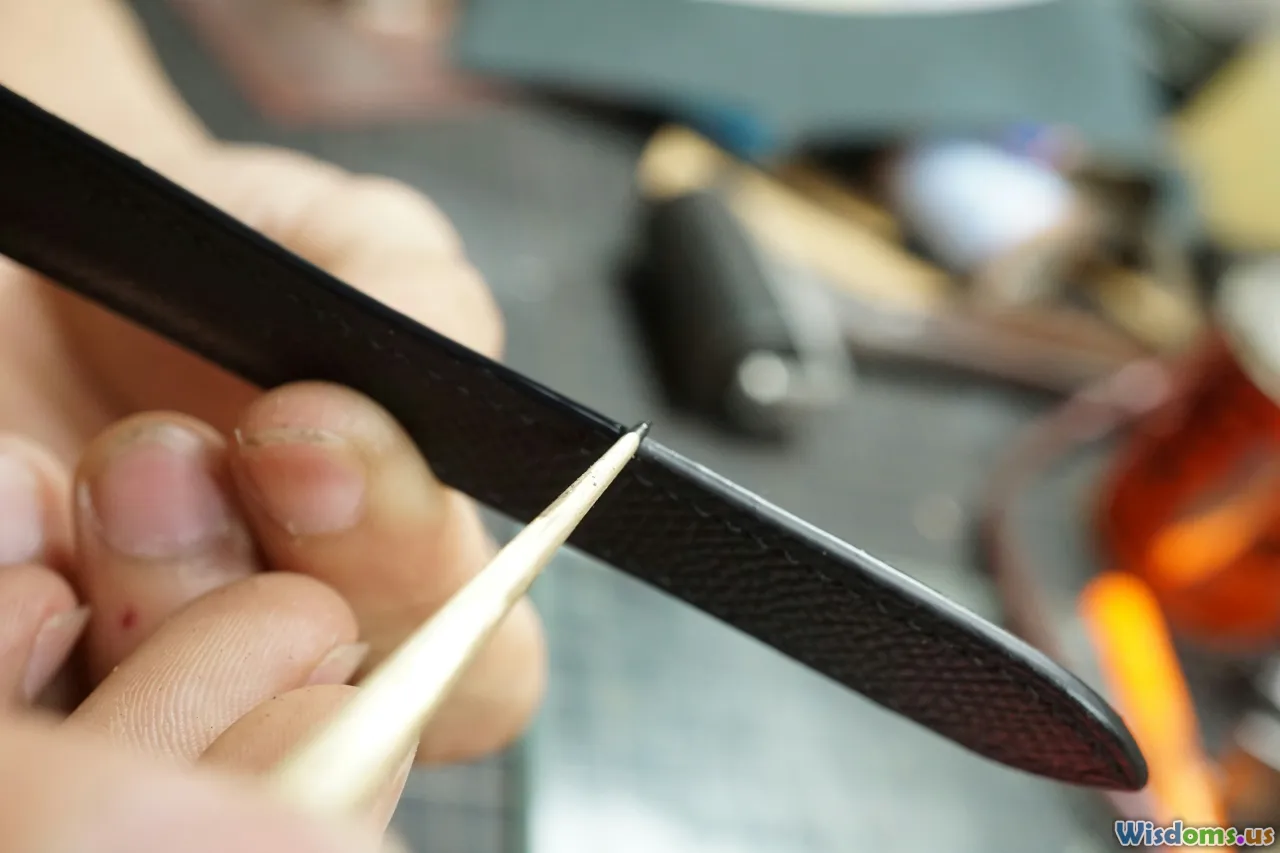
- Diamond awl: For opening marked holes cleanly through glued layers without tearing. Keep it sharp and polished.
- Harness needles: Size 004 or 002 (John James or equivalent) pair well with 0.5–0.8 mm thread.
- Thread: Polyester (e.g., flat-braided types) is abrasion resistant and stable in humidity; bonded nylon is also common. Waxed linen offers a classic look and excellent bite but needs care in damp climates. Typical wallet sizes: 0.45–0.6 mm for sleek builds; up to 0.8 mm for rugged styles.
- Adhesive: Contact cement (solvent-based like Barge, or water-based like Renia Aquilim) to hold seams before stitching. Water-based options reduce fumes and are easier indoors.
- Stitching pony or clamp: Holds your work, so both hands are free to manage needles and tension.
- Edge tools: Creaser, edge beveler, sanding block, and a burnishing setup or edge paint to finish seams.
- Mallet and smooth-faced hammer: To set stitches and flatten bulk without marking the leather.
- Ruler, wing divider (scratch compass), and marking tools: To plot stitch lines and even edge distances.
Leather choice matters too. For a durable wallet:
- Vegetal-tanned leather between 1.2 and 1.6 mm per layer for interiors; 1.6–2.0 mm for exteriors, depending on your desired hand. Chrome-tan can work but choose a firm temper to resist stretching at card mouths.
- If you use soft leather inside, back it with a thin reinforcement fabric (non-woven polyester) at card mouths to fight creep.
Designing the seam: spacing, allowances, and stress mapping
Before you make holes, decide where the stitch goes and why. A durable seam is planned.
- Edge distance: For thin stacks (2–3 mm total after glue), set the stitch 3–3.5 mm in from the edge. For thicker seams (4–6 mm), move to 4–5 mm. Too close risks tear-out; too far looks clumsy and can trap grit.
- Spacing: Finer stitches look elegant but place holes closer together, which can weaken a narrow flange. A 3.38 mm spacing (about 8 stitches per inch) balances elegance and strength for most wallets. Go to 4.0 mm for thicker exteriors or rugged styles.
- Stress mapping: Sketch arrows on your pattern where you expect pull: card slot mouths, the spine fold, and edges near coin pockets. Place short reinforcement stitches or a brief backstitch at the mouths, and avoid starting or stopping a long seam at a high-stress point.
- Seam allowances: Build in at least 3–4 mm glue margin beyond the stitch line so layers bond well. The glue is not a substitute for stitches, but good adhesion prevents creep and makes the holes cleaner.
- Corners: Plan how many holes land on the radiused corner. It is better to adjust spacing subtly along a hidden area than to cram an extra hole right on the corner. Use your two-tooth iron to turn corners cleanly.
Example: A bi-fold exterior stitched perimeter at 3.5 mm edge distance with 3.38 mm spacing, and interior card slots reinforced with two extra stitches (a tiny bar tack) at each mouth.
Preparing the leather panels

Clean prep simplifies stitching and boosts longevity.
- Skive where necessary: Taper pocket edges and fold areas so total seam thickness stays even. For card slots, feather the underside of the top edge so it lies flat after stitching and does not form a hard ridge that can abrade thread.
- Crease or groove: Lightly crease a stitch line with a hot or cold creaser for guidance and later setting. Some makers cut a shallow stitching channel to sink the thread slightly; this protects thread from abrasion. Do not cut so deep you reduce leather strength.
- Glue-up: Dry fit panels, then apply a thin, even coat of contact cement to both surfaces within the seam allowance. Let it flash off per adhesive instructions, then press together firmly. A roller helps avoid bubbles. Good adhesion prevents layers from walking while you punch and stitch.
- Trim and square: Flush-trim edges after glue-up. A sharp knife and sanding block ensure the stitch line runs true to the edge. Uneven edges show in your seam.
Practical tip: Mark the grain side with a faint pencil or scratch line exactly where the stitches will run. Once glued, this line helps place the pricking iron consistently.
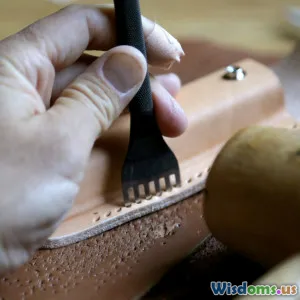
Marking and punching stitch holes cleanly
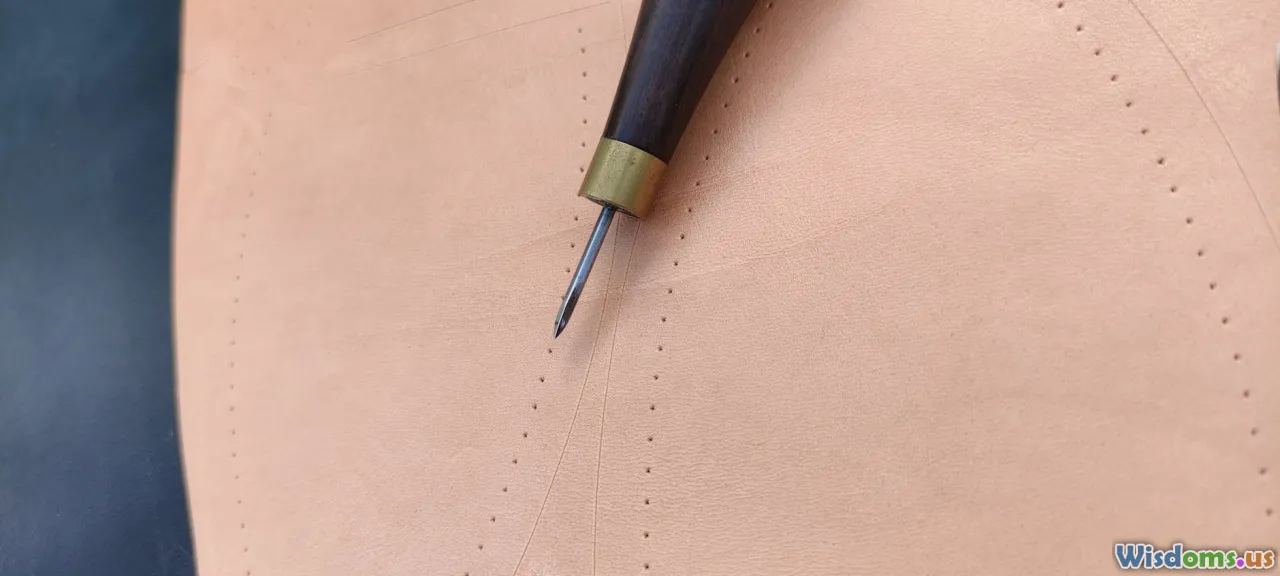
Neat holes lead to neat stitches. There are two mainstream approaches: punch-through stitching chisels or mark-with-pricking-irons and finish with an awl.
- Stitching chisels punch through both layers. They are convenient and fast. However, in thick stacks they can deform the backside holes and trap the tool. Keep them sharp and withdraw straight.
- Pricking irons mark an angled slit on top; you then finish each hole with a diamond awl. This yields crisp, slanted stitches and tighter holes that grip the thread. It is slower but gives excellent control.
Steps for clean holes:
- Clamp the wallet in a stitching pony so the line is vertical and well-lit.
- Start with a longer iron (6–8 teeth) on straight runs to maintain rhythm. Use a 2-tooth iron around corners and tight radii.
- Angle the iron consistently, usually leaning slightly backward, so the slant of your stitches matches on both sides.
- If using pricking irons, open each mark with a diamond awl as you stitch rather than all at once. This maintains hole memory and reduces glue re-bonding.
- Ensure the number of holes match on mating seams. If an extra tooth snuck in, erase the last mark, or split the difference across an inconspicuous span with minute spacing adjustments rather than forcing an awkward final hole.
Avoid blowouts by supporting the backside with a piece of firm scrap leather when punching with chisels. Aim for holes that are just big enough to pass the needles with snug friction.
Thread sizing, needles, and wax: choosing the right combo

Thread is your seam. Matching thread and needle to the leather thickness and hole size improves strength and appearance.
- Polyester vs linen: Polyester is largely unaffected by moisture, resists UV better than nylon, and offers excellent abrasion resistance. Flat-braided polyester sits beautifully in slanted holes and avoids twisting. Linen has superb bite in the hole and a warm, traditional look. Waxed linen can swell with humidity, which is good for locking but requires dry storage of the wallet to minimize mildew risk.
- Diameter: For wallets, 0.45–0.6 mm thread with 3.0–3.85 mm spacing looks refined and wears well. If you expect very heavy use, 0.6–0.8 mm increases cross-section but may overwhelm slim builds.
- Needles: Use blunt-point harness needles that will not cut the thread. Size 004 for 0.6 mm thread, 002 for 0.8 mm, and 006–004 for 0.45–0.5 mm. If the needle is too fat, it will enlarge holes and reduce friction, weakening the lock.
- Wax: Even pre-waxed thread benefits from a light pass over beeswax in dry climates. Wax lubricates the pass and fills micro gaps in holes, improving water resistance. For polyester, avoid excess wax lumps that can mark the leather in heat. For linen, a rosin-beeswax mix adds grip.
Practical check: Pull a sample stitch line on scrap leather stacked to your wallet thickness. The stitch should sit proud but slightly nestled. If it lies too high, consider a shallow stitch groove or a finer thread; if it sinks or the hole deforms, sharpen your awl and reduce needle size.
The saddle stitch, step by step (with the cast)
Once your holes are ready, the process becomes a rhythm.
Setup and thread length:
- Measure the stitch line and cut thread to about 3.0 to 3.5 times its length for standard seams. Add extra if you plan backstitches at both ends. For perimeter seams with corners, 3.5x is safer.
- Thread both needles on a single length. Lock each needle by passing the thread through the eye and piercing back through itself about 2 cm from the end. Pull snug so the needle will not slip off mid-seam.
Body position and holding:
- Clamp the work with the stitch line at a comfortable height, typically chest level.
- Hold the right-hand needle in your right hand and left-hand needle in your left. Keep the thread from tangling by lifting slightly when passing.
Traditional sequence with a right-hand cast for a left-leaning slant:
- Drive the awl through the next mark from the front, maintaining consistent angle.
- Pass the right needle through the hole from front to back. Pull until you have equal thread length on both sides. Keep slight tension so the loop does not collapse.
- With the right-side thread lightly tensioned, bring the left needle from back to front, passing behind the right thread.
- Cast: Wrap the left thread under and over the right thread before pulling through. This creates a subtle knot that locks the slanted form and resists abrasion.
- Pull both threads together, tightening in a firm, level motion. Aim to seat the stitch without crushing the leather. Consistent, moderate pressure beats brute force.
- Repeat, maintaining the same casting routine in each hole. Rhythm matters. Each stitch should mirror the last.
Notes and variations:
- If you are left-handed or prefer a right-leaning slant, reverse the hand sequence and cast accordingly.
- To avoid piercing your own thread, ensure the second needle follows the same channel. If resistance spikes, withdraw slightly and re-aim.
- For super fine work, pinch the seam near the hole as you pull to keep the slant crisp and keep the thread seated at the bottom of the slit.
Backstitching to lock the ends:
- At the end of the line, take 2–3 stitches backward along the same holes to lock. For wallets, 2 backstitches are usually sufficient.
- Reduce bulk by skiving a small ramp under the final 1–2 holes before glue-up, or plan the end to land under a pocket layer. Bury the thread tails between layers when possible.
Corners, ends, and backstitches that do not bulk up

Corners are where seams look sloppy or sing. Treat them with forethought.
- Radiused corners: Use a two-tooth iron to walk around the curve so the spacing stays even. If you end up with one hole too many on a corner, skip a mark one position before the bend rather than forcing an extra hole right on the apex.
- Thread path: Keep your cast consistent through corners. Pause and check the slant after each corner stitch; minor tension tweaks here make a big visual difference.
- Minimal backstitch: Two stitches back are enough in wallet-weight leather. On very slim builds, consider a single backstitch and a locked half-hitch on the inside where it will never be seen.
- Burying ends: After the last backstitch, pass each needle between layers for 1–2 cm and exit out the flesh side. Trim and tamp the exit point with a slicker or bone folder so the tails disappear.
Pro move: Start and end long perimeter seams under an interior pocket, so backstitches are hidden and shielded from wear.
Keeping stitches straight and even: pro tips

Consistency separates amateur from pro. These habits keep your line sharp:
- Light and position: Angle your work so you can see the slant of each hole. Good light and a steady posture prevent accidental twists.
- Marking discipline: Do not stretch your spacing to make a hole fit at the end. Instead, backtrack and subtly adjust where it will hide, or remove a tooth impression with a modeling spoon.
- Tension mapping: Tighten just enough to seat the thread snugly in each hole. Pull to the same count every time, for example, a steady two-count pull while watching the slant. Over-tensioning cuts leather fibers and leads to premature tear-out.
- Set with a hammer: After a few stitches, gently tap the seam with a smooth-faced hammer. This flattens and locks the thread into the leather without crushing. Do this again at the end to even up the entire line.
- Overstitch wheel or heated creaser: Light passes post-stitching can unify the slant visually. Do not overdo heat near synthetic thread; moderate warmth only.
- Needle management: Keep the second needle parked in the leather behind the hole while you pass the first; this keeps the channel open and stops the thread from snagging on edges.
Reinforcing high-wear zones in wallets

Not all stitches carry the same load. Reinforce intelligently.
- Card slot mouths: Add two or three compact stitches perpendicular to the edge at each mouth, forming a small bar tack that stops the slot from spreading. Alternatively, run a short horizontal stitch line inside the slot lip to tie down the lamination.
- Cash pocket edge: Where the bill compartment meets the spine, the edge nearest the fold takes bending stress. Reduce thickness by skiving and move the stitch back slightly from the fold. Some makers also run a narrow strip of reinforcement fabric along the fold line under the leather.
- T junctions: Where one seam meets another, avoid stacking backstitches. Either stagger them or design overlaps so only one seam is at full thickness at the junction.
- Hidden reinforcement: A narrow strip of thin veg tan or synthetic reinforcement can be laminated under a delicate exterior if the leather is soft. Keep it short and only where needed to maintain a clean drape.
- Avoid rivets inside: While rivets are durable on bags, in wallets they can scratch cards and add unwelcome bulk. Stitching and smart lamination are better answers here.
Finishing the seam for longevity and look
The seam is only as good as its finish. Exposed, fuzzy edges wick moisture and rove grit onto thread.
- Trim tails clean: For polyester, singe the trimmed tail with a quick pass of a lighter and mash the nub into the hole with the hot needle eye. Do this carefully to avoid heat marks on the leather. Do not melt linen; it will char. Instead, rely on buried ends and wax.
- Edge finishing: Bevel, sand progressively (220 to 800 grit), and burnish with water or gum tragacanth. For chrome-tan or difficult-to-burnish leathers, use an edge paint system in thin coats, sanding between layers. A sealed edge protects thread at the boundary.
- Wax set: Rub a little beeswax over the seam and warm it gently with a hairdryer to let it sink in. Follow with a light hammer set. This seals the thread and smooths minor irregularities.
- Protective balm: A conservative application of leather balm or a neutral conditioner can replenish oils in veg tan near the seam after all the handling you have done.
A seam that is flush to a crisp edge resists snagging when sliding into pockets and simply looks better.
Troubleshooting common problems
Even seasoned makers run into hiccups. Here is how to fix them without starting over.
- Fraying thread mid-seam: If polyester frays from abrasion on a sharp hole, stop. Trim the fuzzy section, melt a tiny nub if using synthetics, and re-lock the needle to the shortened thread. To restart without a weak spot, begin 2 holes back and backstitch forward to your stopping point.
- Misaligned holes: If the backside hole wanders, switch to opening each mark with an awl as you stitch. Use a strop-polished awl so it slices rather than tears. On a minor miss, the stitch will visually correct itself once tensioned and hammered.
- Torn hole near the edge: If a hole splits, skip that hole and distribute tension across neighboring stitches. Apply a pinpoint of thin CA glue to the split, let it cure, and sand lightly before continuing. Adjust edge distance next time.
- Uneven slant: Check your casting rhythm; inconsistency is often the cause. If the seam flips slant halfway, you probably inverted the cast or changed hand dominance through a corner. Correct and continue; the hammer set will de-emphasize the transition.
- Stitches too tight and puckered: You over-pulled or your glue grabbed in a warped position. Warm the area gently with a hairdryer, flex the seam, and tap with a hammer to relax. Pull more gently going forward.
- Glue bleed into holes: Too much adhesive. Open holes with the awl just prior to stitching to break any film. Wipe needles with a tiny bit of wax to resist glue.
- Broken needle inside the seam: Extract with pliers if visible. If not, leave it rather than tearing fibers apart, and reroute the stitch using the adjacent holes with a slight detour. Mark the pattern to avoid a repeat in that area of thick lamination.
Example build: a slim bi-fold wallet
Let us put it together in a concrete example you can follow.
Specs:
- Exterior: 1.6 mm vegetable-tanned leather.
- Interior card pockets: 1.2 mm vegetable-tanned leather, skived at the mouths to about 0.6–0.8 mm.
- Stitch spacing: 3.38 mm French iron, 3.5 mm edge distance.
- Thread: 0.5–0.6 mm polyester, lightly waxed.
- Needles: Size 004 harness needles.
Steps:
- Cut pattern pieces cleanly, oversizing each by 1–2 mm to allow for trimming after glue-up.
- Skive the top edges of card slots and the fold area of the exterior. Crease decorative lines along card mouths if desired; they also stiffen the lip.
- Glue card slots onto a lining panel. Press firmly with a roller. Stitch the small vertical seams that define each pocket. Add a 2–3 stitch bar tack at the mouth ends.
- Prepare the cash pocket divider if used. Skive top edge and crease.
- Dry fit the interior assembly to the exterior. Mark the perimeter stitch line at 3.5 mm from the edge with a wing divider.
- Apply contact cement to the perimeter seam allowance and any interior glue zones. Let flash off and press together. Roll flat.
- Flush-trim the entire perimeter. Bevel edges slightly for a neat profile.
- Mark the perimeter stitch line with your iron. Use a longer iron on the straight runs; switch to a 2-tooth around corners. Check count so you do not land an awkward hole at the fold.
- Clamp in a pony. Thread 3.5x seam length on two needles.
- Begin at the fold area but one or two holes away from the highest stress point, so backstitches do not land right on the fold. Work around the perimeter using a consistent cast. Open each hole with an awl just before the needles pass if you used pricking irons.
- At corners, take your time. Keep the slant uniform, and do not be tempted to pull extra tight, which flattens the curve unnaturally.
- Backstitch two holes at the end. Bury ends between layers and out through the flesh where possible. Trim and, for polyester, singe and set the nubs discreetly.
- Lightly hammer-set the entire seam on a smooth, hard surface.
- Edge finish: Sand progressively, then burnish with water and a touch of soap or gum, or apply edge paint in multiple thin coats with light sanding between passes. Seal with wax.
- Condition lightly, then let the wallet rest overnight under a flat weight so the glue and fibers settle.
Time check: A careful first build may take 4–6 hours end to end. With practice, you will cut that in half without sacrificing quality.
Time, care, and realistic expectations
Durability is a partnership between build and use. Saddle stitching sets you up for success, but basic care keeps the wallet in service longer.
- Break-in: Veg tan softens and molds with body heat. First weeks are key; avoid overstuffing to keep seams from being permanently stretched.
- Moisture: If the wallet gets soaked, empty it, blot gently, and let it air dry away from heat. Heat can harden leather and make thread wax bloom.
- Cleaning: Wipe occasionally with a damp cloth, then condition sparingly with a neutral balm. Over-conditioning swells fibers and loosens seams.
- Wear patterns: Expect shiny burnished high spots and softened edges over time. This is patina, not failure. Thread should remain tight and seated. If you see fuzz or cuts on thread, apply a bit of beeswax and tap to re-seat; plan a reinforcing stitch if damage progresses.
What to expect from a well-stitched seam:
- Even slant on both sides of the seam, not just the face
- Tension that holds but does not pucker
- Backstitches that are invisible or at least discreet
- Edges that are sealed, with thread protected at the boundary
A strong wallet seam is not an accident; it is a string of small decisions carried out patiently. From hole spacing to thread choice to the final hammer tap, each step either preserves the leather or compromises it.
Bringing it all together, saddle stitching a durable leather wallet is about controlling variables you can see and feel. Pick appropriate materials, plan your seam with the wallet’s stress map in mind, prepare clean holes, cast consistently, and finish with care. The reward is not just toughness but a rhythm and look that only hand stitching can offer. With one or two builds under your belt, the technique becomes second nature, and the wallet in your pocket becomes a testament to your hands and attention.
Rate the Post
User Reviews


Popular Posts


